Sunday 4 December 2016

3D Printed Object

So we finally got the object we wanted printed off! And this is the one we ended up going with!


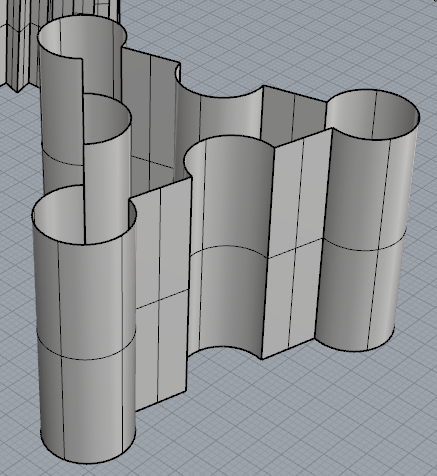
We both figured that this object was probably the easiest for the printer to print out, however, we did have to make a little change to it. The "cut out" section of the object was a little too compressed for the printer to print out clearly, so we simply removed a few of the little slices taken out of the object. As you can see here from the 3D print itself.


And as you can see it came out looking pretty good!! Very few marks left on it from the 3D printing itself!

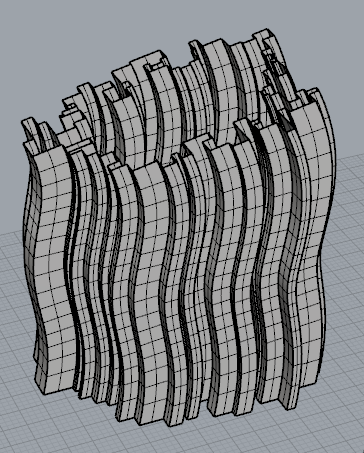
Anyway both Olivia and I figured this was the model we wanted to go with because it combined both aspects from a couple of our favorite designs. Hers having a chunk cut out from it, and mine looking somewhat pixelated. We simplified a couple aspects into what I think came out looking quite clean and visually aesthetic. 


Anyway there really wasn't too much grief associated with this print, it was pretty much just fun all the way through! Buuuuuut a lot of that is thanks to out instructor Brian Cera. He did all of our 3D printing for us sooo that helps quite a bit! Well there ya have it! Call it a vase or something, it can actually retain water to a certain level so yeah! Thanks for reading!


Monday 28 November 2016

Self Supporting Structures Remix

So for the next project in my 3D object design class we've been paired up and have to make a remix of two of the objects (done by both of us) of our choosing. Anyway the two we've decided on are the ones shown below!


This object done by Olivia Carr, you can find more of her stuff at: http://olivias3dobjectcreation.blogspot.ca/

She's done some pretty cool stuff with mixing our concepts together!


This one is my own. Now moving on to the remixed objects I've created, and as I've mentioned before you can find Olivia's concepts at: http://olivias3dobjectcreation.blogspot.ca/.


The first mix of the two I designed. Pretty basic but I wanted to start of simple.


Aaannnnnnd this one kinda jetted off of the first. I really just tried messing with the form of the thing.


And now I've started playing with the "cut out" Olivia had in her original object. Some of them have some complex geometry in the "cut out", and I wasn't quite sure if that looked right to me. So on the upper left hand object I simplified it quite a bit, I thought that looked a lot better, sooooooo I kept the idea!


And from that I thought it might be cool to form more of a vase kind of shape. Again with the same type of simple geometry.


Then I began to think that the simple texture of the vase was kinda plain, and boring, so I thought to add some soft spine-like bubble things on the outside, as well as a bit more of a "rippled" extrusion.


And this is the same object as seen above, just contorted in different ways.

I think if i had to choose one that I liked best it would have to be this baby right here: 
it's slightly more simple than the two above it, and I kinda like that, I feel if the object is too complicated it can take away some of the simplistic ascetic I associate with a 3D printed object.

So there ya have it, hopefully Olivia and I can find one we both agree on! Or even mash some of them up even further. Thanks for reading.

Sunday 20 November 2016

Digital Sketching Self Supporting Structures

So I made 10 different self supporting structures, (or what I hope will end up being self supporting) that I can eventually refine and mix with a Partner from my class. Anyway here are the ten examples I have!


I think my favorite would have to be the somewhat digital looking structure. I think it will be interesting to remix it with someone else's idea, hopefully theirs isn't too similar! But there you have it, looking forward to refining some of these ideas! Can't wait to see what we get in the end!

Monday 14 November 2016

Papercraft Final

So in the end with my paper craft design I decided to leave it pretty much where it was, however, the idea came up in a critique of adding a few friends for the little green monster thing. So that is exactly what I did. Take a look.


And there you have it! A few friends! Now I'd like to maybe add even more of them, and start a little series of geometric monsters! When I can find some time between all of my other classes... Anyway here are the templates for the designs if you were interested.


I had a lot of fun working on this project, granted managing to fin them together could be quite a pain sometimes, designing them and bringing them to life made it totally worth it!

Monday 7 November 2016

Papercarft Texture Update

So I took my previous design in paper craft and added a texture to it! It defiantly makes a big difference (in a good way) and beyond a few more refinements I think she's lookin' good! I'll put up both textured and non textured pictures so you can see the differences yourself!


So from seeing this you can probably gather that I like creepy little monster like things, sooooo thats what i went for when designing this texture! I think it came out looking pretty good! (Like I said, besides a few refinements and better craft.)


As you can see there's a pretty big difference between the two! Anyway, I plan on refining the final model more, but this is where she's sittin now!

Sunday 30 October 2016

Papercraft Prototype

Finally moving out of the digital world and into the physical, I've developed a prototype papercraft object from an object from my previous post. I'll walk you through the process.

So below is the object I started with, if you want to see the design in Rhino, just check out my last blog post.


The object cut out.


Starting my first folds.


Alright now here I realized that I had one too many tabs, so I just cut it off... kind of a pain to do, but once I got it, it worked muuuuch better.


And finally a few snapshots of the final product!


It was actually pretty fun designing and building this thing, I'd like to spend a little more time with the program and try some crazier stuff in the future!

Sunday 23 October 2016

Digital Samples of Papercart

So we're moving towards paper craft in my 3D object design course, and as a project we had to compile some digital samples of 3D objects exploded into a 2D form, as to be able to print it out and actually be able to form it into a 3D object in the real world. Here are a few simple examples I've done in class:


Now doing this for the first time, I really didn't experience too many difficulties with the process. I mostly found the process to be extremely tedious. I WISH there was an option to have the program automatically flatten these objects! Maybe in the future... Thanks for reading!